
Migrating WooCommerce products can be straightforward. Whether you’re upgrading your site, changing hosts, or combining stores, ensuring accurate product data transfer is essential for a smooth shopping experience.
The WebToffee Product Import Export Plugin for WooCommerce plugin makes this process easy, allowing you to export and import products seamlessly using CSV files. In this guide, we’ll show you how to migrate your products using the free version of the WooCommerce Product Import Export plugin, quickly and without any hassle.
Exporting WooCommerce Products
To migrate your WooCommerce products, start by exporting them as a CSV file. The Product Import Export for WooCommerce plugin makes this easy, generating a ready-to-import file in just a few clicks.
Here’s a step-by-step guide to exporting your products efficiently.
Step 1: Install WebToffee Product Import Export Plugin
From your WordPress dashboard
- Go to Plugins > Add New Plugin.
- Search for “Product Import Export for WooCommerce” plugin.
- Install and Activate the plugin.
Step 2: Select Product as Post Type
After plugin installation is complete,
- Go to WebToffee Import Export (Basic) > Export.
- Choose the post type to export as Product.
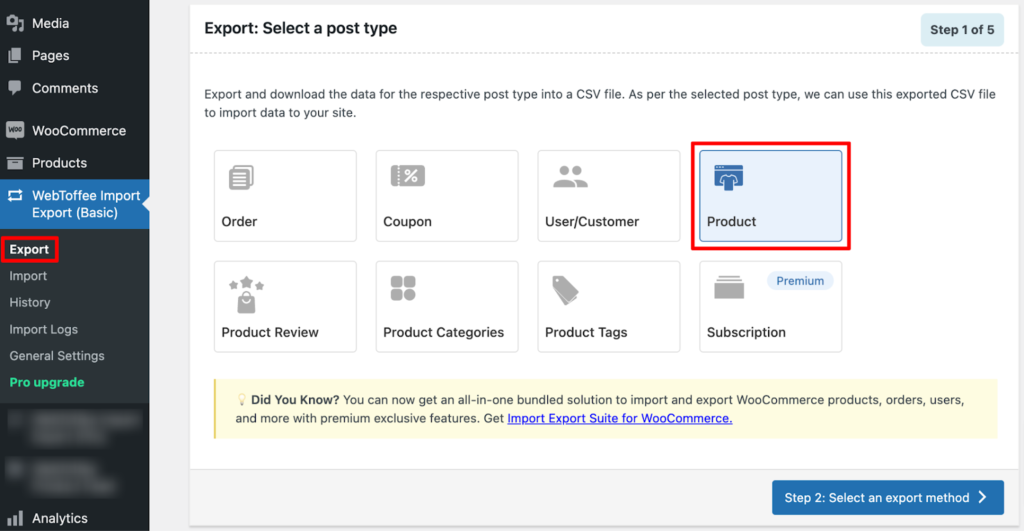
- Click the Select an export method button to proceed to the next step.
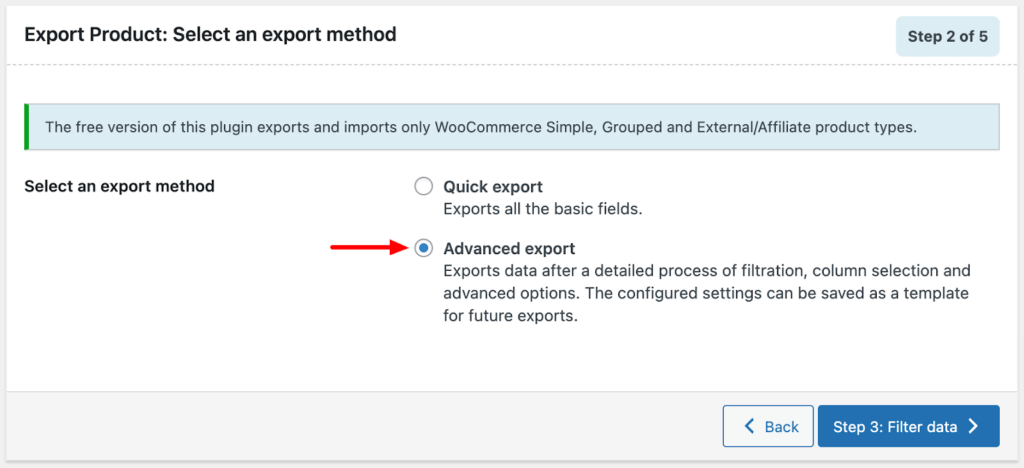
Step 3: Select an Export Method
The plugin offers two export options:
- Quick Export – Instantly export all products with essential details in one click.
- Advanced Export – Customize your export by selecting specific products, fields, and filters.
Choose the option that best fits your needs!
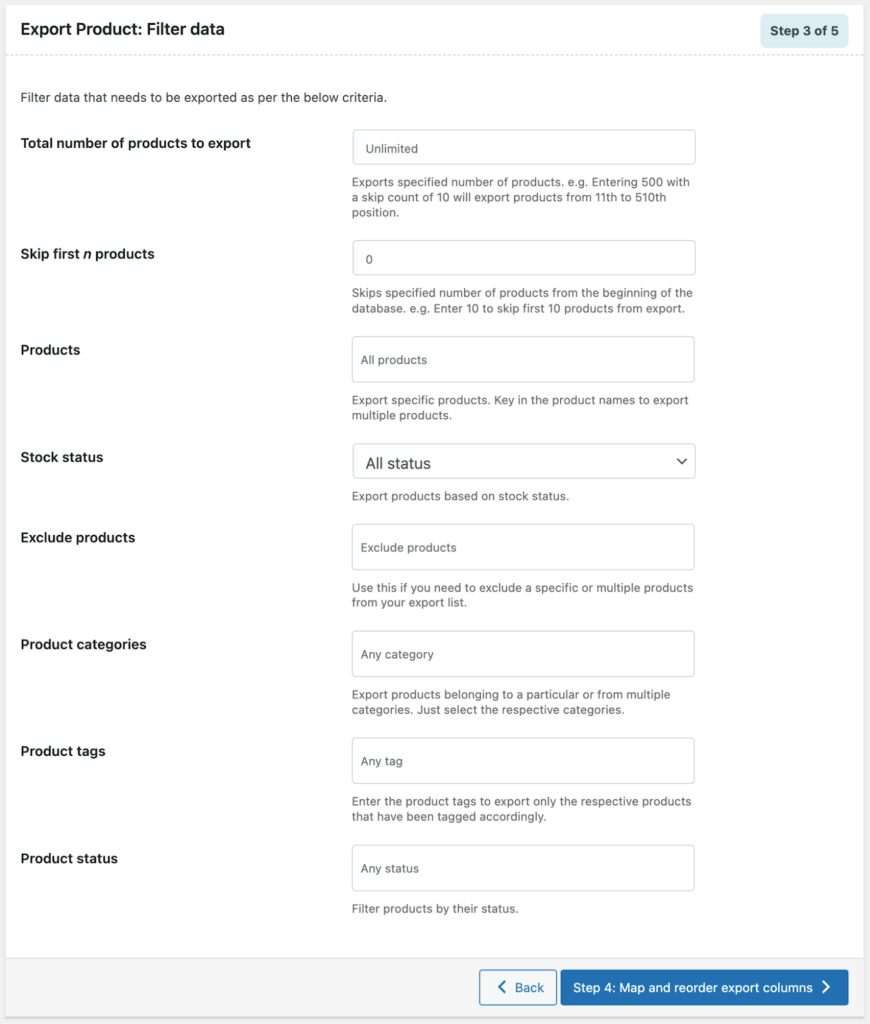
Step 3: Filter Export Data
In this step, you can filter the data to export. Options include setting a product limit, skipping initial products, or exporting specific products by category or tag.
Step 4: Map & Reorder Columns
Here,
- Choose which product data columns you want to export.
- Specify the names of these columns in the CSV file.
- Rearrange the column positions using the drag-and-drop icons.

Once selected, proceed to the next step.
Step 5: Export Products
This is the final step in exporting your WooCommerce products. Here,
- Set Batch Size – Defines how many products are processed per cycle.
- Choose Delimiter – Select a column separator for the CSV file.
- Click Export – Start the export process.
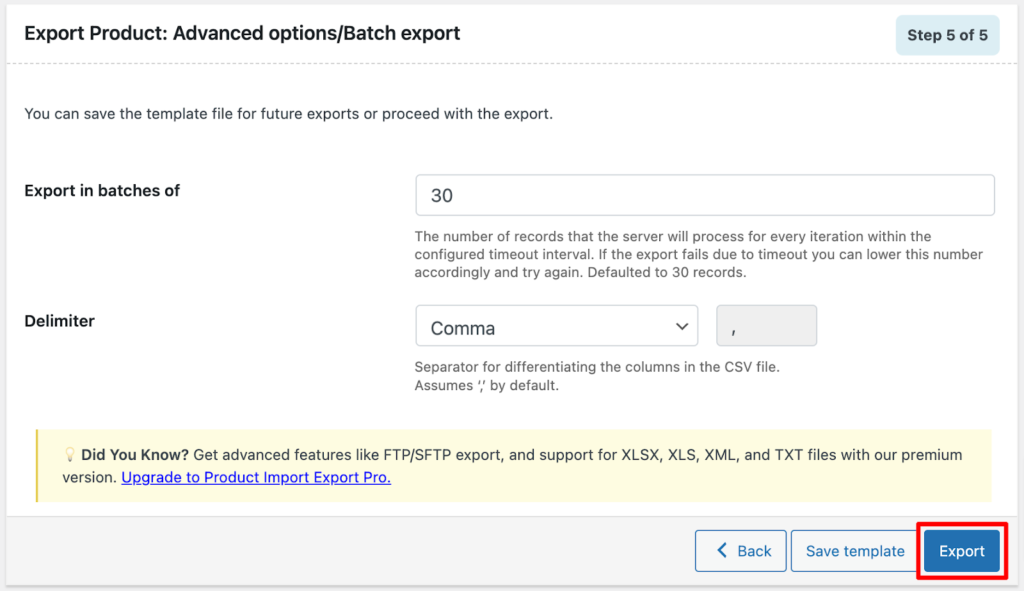
A pop-up window will show up with a Download File button. Click this button to save the exported CSV file to your computer. The file will contain all the products and columns that fit your chosen criteria.
Importing WooCommerce Products
Next, import your exported products into your new WooCommerce store using the Product Import Export for WooCommerce plugin.
Ensure your CSV file is UTF-8 encoded for a smooth import.
Follow these steps to import your products.
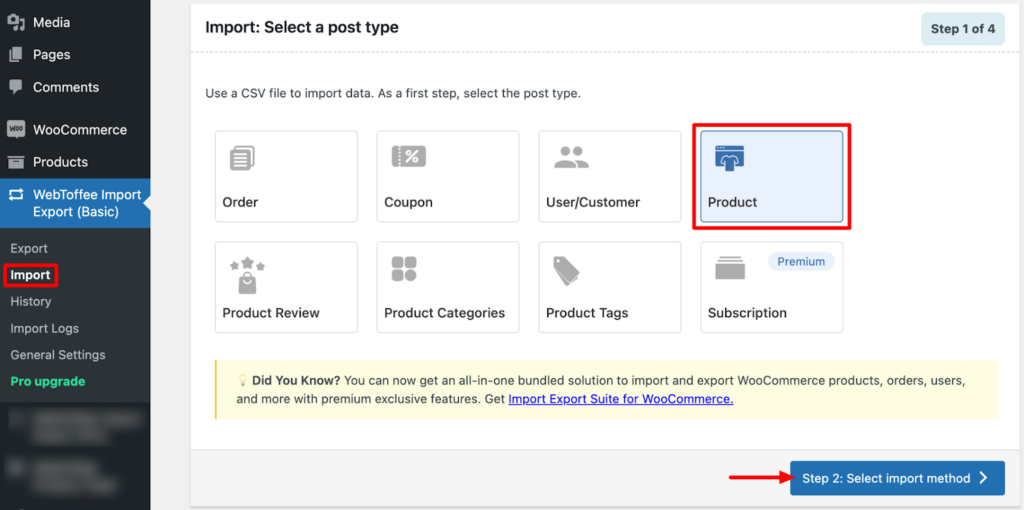
Step 1: Select Product Post Type for Import
From the WordPress dashboard,
- Go to WebToffee Import Export (Basic) > Import.
- Select Product as the post type.
- Click Select import method.
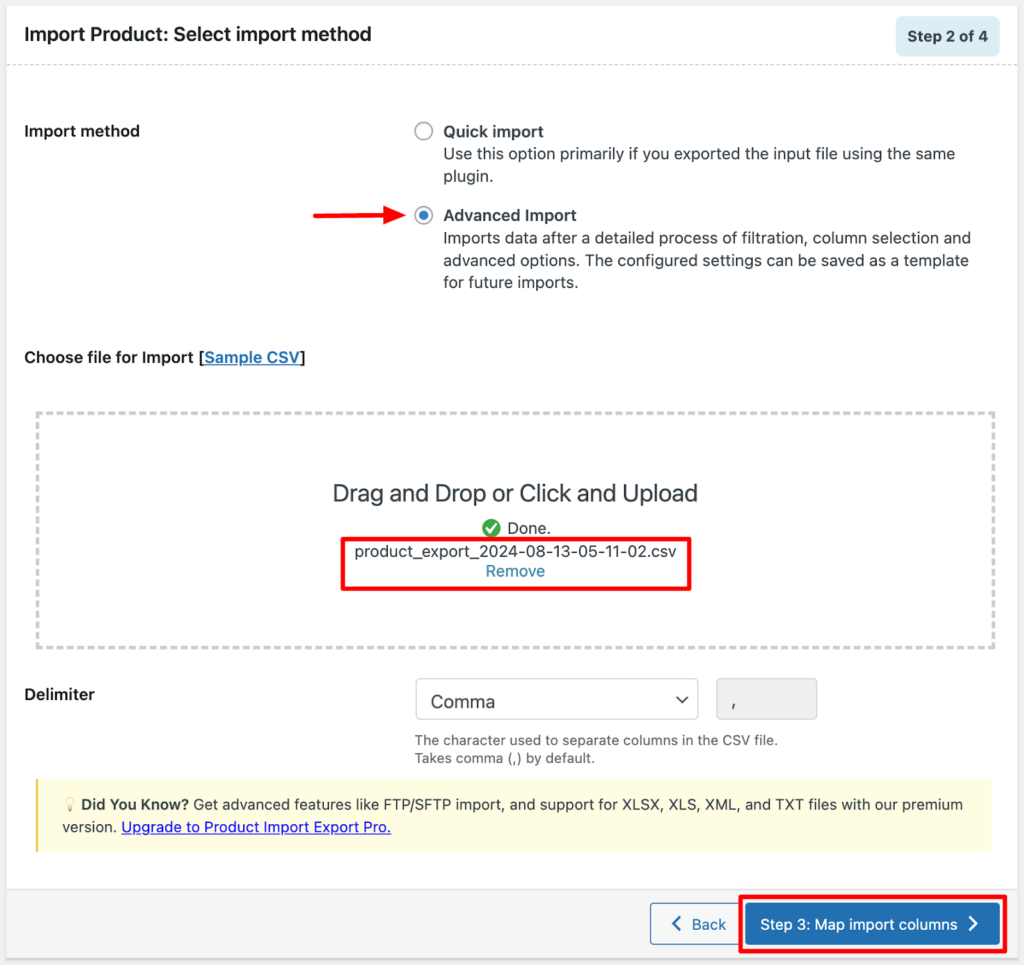
Step 2: Choose Import Method
Next, you need to choose an import method for bringing your products into WooCommerce. You have two options: Quick Import and Advanced Import.
If the exported file was created using the same plugin, opt for the Quick Import option. Simply upload the file and click Import to easily transfer your products to the store.
Now, let’s consider the Advanced Import method, which offers more control with its advanced options. After selecting this method, upload the CSV file you just exported and choose a delimiter from the drop-down menu to separate the columns in the CSV file.
Then, click on the Map import columns button to proceed.
Step 3: Reorder Columns of Products CSV File
Next, you must ensure your CSV columns align with WooCommerce product fields. The plugin auto-maps headers if they match WooCommerce fields.
If not, manually adjust them by selecting the correct headers from the drop-down. Then, click Advanced Options to finalize.
You should accurately map and format product fields to prevent import errors. Double-check all mappings to ensure correctness.
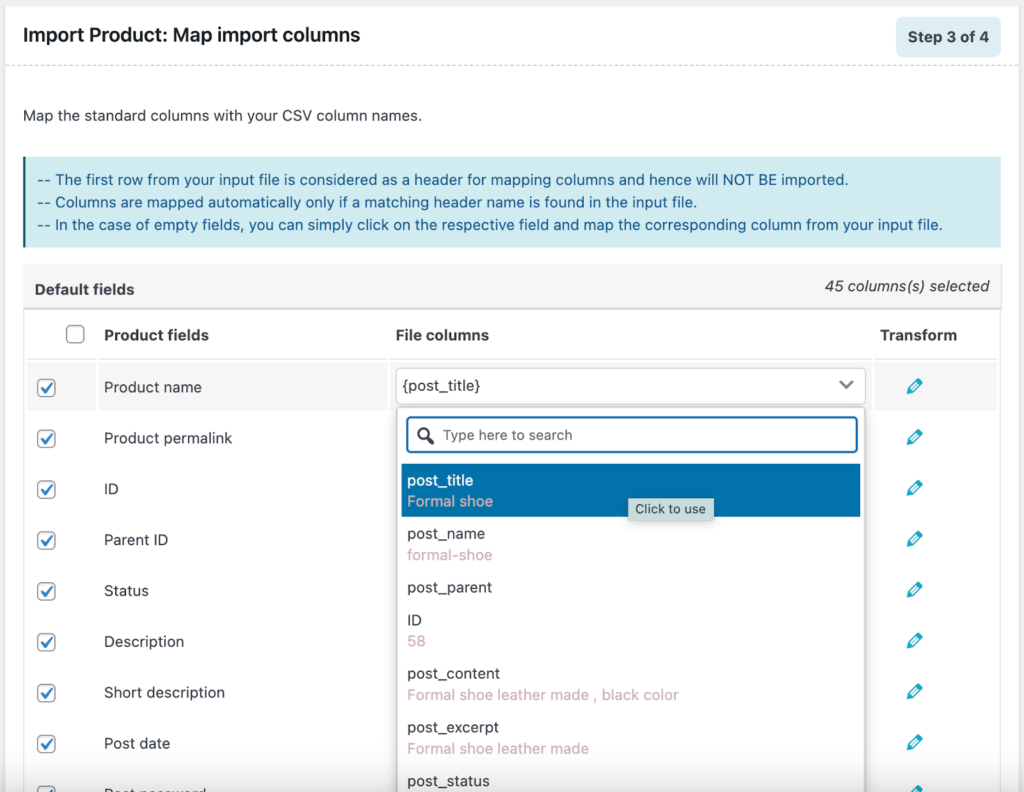
Proceed to the next step.
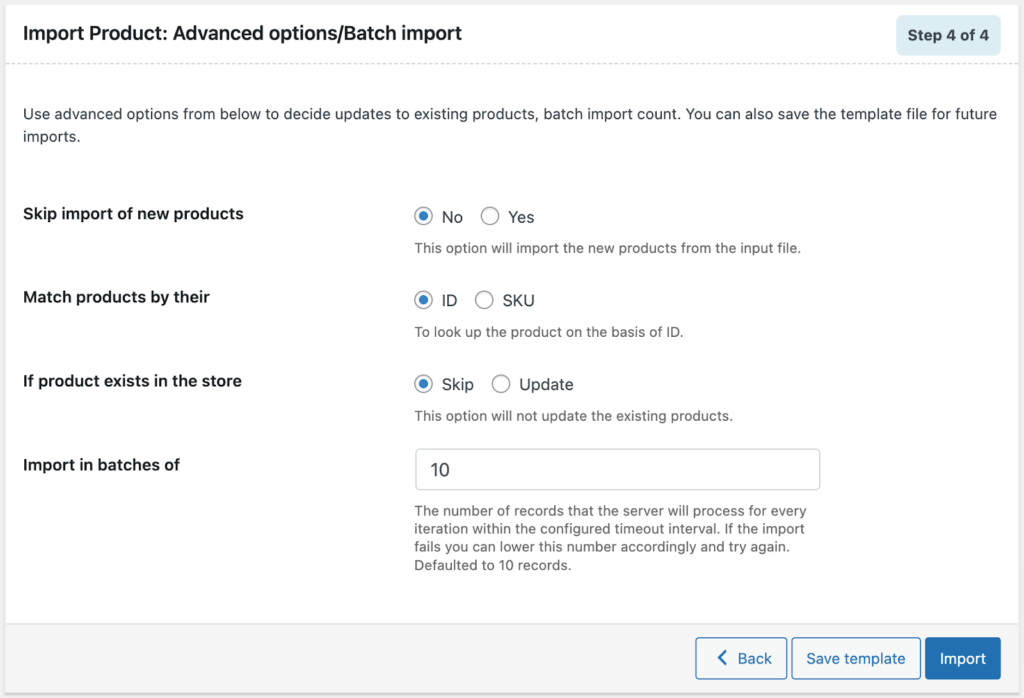
Step 4: Configure Advanced Import Options
Next, configure advanced import options:
- Choose to import or skip new products.
- Select ID or SKU for product matching.
- Decide whether to skip or update existing products.
- Set the batch size for imports.
Once finalized, click Import to upload your WooCommerce products from the CSV file.
Once the import process is complete, all your WooCommerce products and their details will be successfully transferred to your new store, keeping your data intact and making the setup easier.
For better functionality, you might want to consider upgrading to the premium version of the WooCommerce Product Import Export plugin. It includes advanced features that improve the efficiency of product data export over the free version.
Conclusion
Moving WooCommerce products is straightforward with the WebToffee Product Import Export Plugin. This tool makes it easy to migrate products between stores, helping you save time and reduce complications.
Follow the steps in this guide for a smooth product migration and focus on growing your business. WebToffee also has other plugins like WooCommerce Order Import Export and WordPress Users Import Export, which simplify the transfer of orders and user data.
We hope this guide proves helpful. Please share your feedback or any questions in the comments.
- The Ultimate Guide to Keyword Research in 2025: Best Ideas for New and Old Websites - March 8, 2025
- How to Migrate WooCommerce Products from One Store to Another - March 7, 2025
- Top 10 Web Designing Companies in India (2025) - February 27, 2025